Friday, December 26, 2008
Gift bag ideas
At left is an old gift bag re-covered with new wrapping paper. A covered cereal box with lace trim is on the right.
Christmas has come and gone. Now it is time to clean up the wrapping paper and gift bags. Gift bags can usually be reused but some may look a little worn. But before throwing them out consider re-covering them to give them a second life.
Bags that are torn, wrinkled or just plain look worn out can be covered with a new piece of wrapping paper. This makes the bag ready for the next gift that you give.
We have three birthdays in our family that come within a month of Christmas. So we used birthday paper to re-cover worn out Christmas bags.
For us craft glue worked best to attach the new paper to the old bag. To determine the amount of paper needed we laid the bag on the paper to measure the height of the bag then added about four inches. We folded about two inches to the bottom of the bag and two inches to the inside top of the bag. This gave it a nice finished look.
Also if you run short of gift bags just cover cereal boxes or other boxes with wrapping paper. We first cut the flaps off the top of the cereal box. After covering the box using the same method as with the bag, we used a paper hole punch to make two holes on each side, then threaded a cord or ribbon through for the handles. We used scrap macramé cord for the one pictured with this article.
If no wrapping paper is on hand consider spray painting the box. Then glue the front of an old greeting card in the center for decoration. Rubber stamps could also be used to decorate a painted box.
Fabric is another material that can be used to cover a bag or box. To dress up a plain gift bag glue lace or other fun craft trim to the top edge. Look for ways to personalize each bag.
Always look through what you might have on hand before going out to purchase new supplies. If you do not have exactly what you want, think of alternative items that can be used instead. Be creative and come up with ways to recycle used materials and scraps leftover from past projects.
Other gift wrapping ideas we have written about in the past include: making gift boxes from facial tissue boxes, Sept. 26; sewing gift bags from the legs of used denim jeans, June 20 and a fabric drawstring bag, June 15, 2007.
Don’t forget to give a personalized card with your gift also. We wrote on homemade card ideas June 22, 2007.
Friday, December 19, 2008
Card models/P&P games
Top and bottom view of paper model skateboards.
It is only one week to Christmas. If the gift shopping list is longer than the available finances we have some suggestions that may help. Free print and play games and free paper models can be found on the Internet. Both of these activities are great for children and adults. All that is required is a computer with Internet access, a printer, paper, scissors and glue.
One interesting site we visited recently is called Phil’s Creations at http://sitekreator.com/thewoodengraver61/freepapertoys.html. The skateboards in our photo today come from this website. Other models at this site include a locomotive, “blowrockets” and a “spybot.”
In the print and play game category a good resource for game reviews is the “Print & Play” podcast. It can be found on iTunes, or on the web at http://printandplay.blogspot.com/. It reviews a wide variety of mostly free games. They even include seasonal games to help with the Christmas spirit.
Another source for information is the Board Game Geek. They have a list of free print and play games at http://www.boardgamegeek.com/geeklist/7351/item/117550#item117550.
We tried several of these games and have a few favorites. One is called “Cthul-B-Q.” It is a tongue-in-cheek card game about fighting monsters, taking them to your kitchen and serving them up on a platter. Each player is a cook, and they have certain cooking skill points and sanity points. The one that can cook up the most monsters without going insane wins.
Also we liked a game called “It’s All Chinese to Me.” This is a card game that has the players, who probably don’t speak Chinese, order food in Chinese, like they were in a Chinese restaurant. The one that actually get the most of what they order wins.
Another clever game is called “Pirates and Plunder.” This is a tile laying game where each player on their turn places a tile that becomes part of the game board. The tiles include ocean and island areas and can be played in a number of ways. Depending on the play, the tiles are worth various points. The player with the most points at the end of the game wins.
Some of the games are based on historical events and some are just for fun. Any family is sure to find something they like. And don’t forget the assembling. Sometimes that is as much fun as the game itself.
Our past columns on this subject can be found at the blog site listed below. They were “Card models” on July 18 and “Making Dune game” June 13.
Just a thought: “And the Grinch, with his Grinch-feet ice cold in the snow, stood puzzling and puzzling, how could it be so? [Christmas] came without ribbons. It came without tags. It came without packages, boxes or bags. And he puzzled and puzzled 'till his puzzler was sore. Then the Grinch thought of something he hadn't before. What if Christmas, he thought, doesn't come from a store. What if Christmas, perhaps, means a little bit more.” Dr. Seuss
Friday, December 12, 2008
Angel Ornament
Angel Christmas ornament made from cellophane twisted paper ribbon.
Custom made Christmas ornaments give a personal touch as apposed to those purchased at the store. Over the years we have made many ornaments. Some ornaments we made for a special occasion and some just because we wanted to try a new craft.
One quick and easy ornament is an angel made from twisted paper ribbon. It is simple and inexpensive to make. Most of the materials used can be scraps leftover from previous crafts.
Materials needed are:
19 inches of twisted paper
8 inches 1/4-inch satin ribbon
Small ribbon flower
Small piece of floral wire
1 Christmas ball about 1-inch diameter
3 inch piece gold cord
Hot glue
The twisted paper ribbon is cut into an 11-inch piece for the wings and an 8-inch piece for the body. Untwist the paper ribbon folding the piece for the wings into two loops with the ends in the middle. Use floral wire to hold the shape. Next fold the body piece in half and twist the floral wire around the ends attaching it to the wings.
Hot glue the gold cord into a circle and then glue onto the top back of the Christmas ball to make the halo. Next glue the Christmas ball head onto the top of the body where the wings are attached.
Make a bow out of the 1/4-inch satin ribbon and glue below head. Also glue the small ribbon flower in center of bow.
The twisted paper is also available in metallic and cellophane types. These can be fancier than the plain twisted paper. If going for a country look the plain paper is good. But for a glitzy look the other types might be the ones to use.
The Christmas balls we used are the ones covered with silky type thread. Glass balls or other types can also be used depending on the look you want to achieve. A piece of gold pipe cleaner can also be used in place of the gold cord for the halo.
Depending on the desired look, other ribbon and flowers can be used to put the finishing touches on the angel.
These ornaments can be used as gifts in an ornament exchange. Also a set of six would make a nice gift for a newlywed couple celebrating their first Christmas.
For children looking to make their teachers or club leaders a gift, this is an easy enough project for them. Grandmas and grandpas would appreciate receiving them also. Just one note of caution, make sure an adult supervises the use of the hot glue gun.
Handmade gifts are always more special because of the extra thought that goes into them. Be creative and make something special for the ones you hold dear. They will be reminded that you care about them.
Friday, December 5, 2008
The Happy Tree
“The Happy Tree.”
Helping others is a way to spread good cheer. This should be our focus all year long and not just during the holidays. Several years ago we came across a craft that helps remind us of this fact.
Going through an old Nov. 1981 “Tole World” magazine we came across a little tree created to teach a simple lesson to children and adults of all ages. It is called “The Happy Tree.” It also gave the story behind the tree.
We got the idea for our “Happy Tree” from this article and created many trees to give as gifts to others hoping to spread the idea that happiness can come from helping others. The tole painting magazine tree pattern is only about 10 inches tall, cut from a one-inch thick board and sanded.
We used walnut wood cut from trees that had died in our orchard. Our trees are about 24 inches tall including the star by about 16 inches wide and 2.5 inches thick. We cut them with a chain saw and left them with a rough finish. Our trees each turned out slightly different shapes as would real trees that grow naturally. Also none of them had a “perfect” shape to them just like the tree in the story.
As the story goes this tree grew up a bit crooked and windblown. But he is not focused on looking for perfection but instead to offer his warm, loving arms as shelter to all of his forest friends. It was said that his protective boughs and smiling heart give joy to the creatures through wind, rain, heat and cold all year long.
The story continues to say that each Christmas the creatures would return his love with gifts from nature: berries and nuts for garlands, glittering snow for shine and a star from the heavens to top him off in glory.
We illustrated the story by painting the tree with garland, snow and a happy face similar to the one in the magazine. To be able to display our tree outdoors we used paint that would stand up to the weather. Then we cut a star from tin and used a nail to punch holes along the edge to give it a decorative boarder. We used a nail to attach the star to the back of the tree so it is sticking up above the top.
To hold the tree upright we cut a six-inch base from another tree branch. It is secured with nails to the bottom of the tree.
We encourage everyone to help spread good cheer all year long. Share your happiness with others. Christians can even share the lasting happiness they have with others. Show love to others as Christ loves us.
Friday, November 28, 2008
Ideas for leftovers
Leaf biscuits shown with leaf cookie cutter.
This is the day after Thanksgiving. Many have lots of leftovers including turkey. Now for those searching for ideas on what to do with the turkey leftovers here is an idea.
Sandwiches are always nice but they can get tiresome after a few days. We suggest making biscuits with the recipe below to make a more interesting sandwich with that turkey.
These biscuits are cut in the shapes of leaves to go with the season. This is also a fun recipe to have the children help with.
Ingredients include:
3 1/2 cups flour
1/2 cup oat bran or whole wheat flour
4 teaspoons baking powder
1/2 teaspoon baking soda
1/2 teaspoon salt
11/3 cups buttermilk
1/2 cup canola oil
Mix all dry ingredients together and then add wet ingredients and stir until flour mixture is just moist.
On a lightly floured surface knead dough gently for 10 to 12 strokes. Roll out to one inch thick.
Cut with a 3-inch leaf-shape cookie cutter, dipped in flour between cuts.
Put biscuits onto ungreased baking sheet.
In a bowl combine 2 tablespoons melted butter or margarine and 1/2 teaspoon paprika. Brush biscuit tops with butter mixture.
Bake biscuits for 10 to 12 minutes or until bottoms are browned in a 450 degree oven. Cool on a wire rack.
With a serrated knife or sharp knife, cut biscuits in half horizontally.
Spread bottom half with two tablespoons apple butter. Top with slices of turkey and cover with top of biscuit.
The recipe makes about 10 to 12 sandwiches.
We like these best served warm but they are good cold also. Also we only have one leaf cookie cutter. If you have several different leaf shapes it is even more fun.
To go with the sandwiches we suggest making berry-ginger cider. Again the children can help put this recipe together.
This is a good recipe to use the blackberries that were picked this last summer and stored in the freezer. For those who did not get a chance to get local blackberries store bought frozen berries will work also.
Ingredients include:
12 ounces unsweetened frozen blackberries
3 tablespoons honey
1/2 teaspoon ground ginger
8 cups apple juice
In a blender combine berries, honey and ginger. Cover and blend until pureed.
Press berries through a fine-mesh sieve; discard seeds. Add berry mix to apple juice.
Serve over ice for a cold drink or heat to serve like warm cider.
Recipe makes eight servings. It will keep up to two weeks in the refrigerator.
For other variations red raspberries, blackberries or pomegranates can be used instead of blackberries.
Our Nov. 23, 2007 blog has more ideas for leftovers.
Please share your favorite fall recipes with us.
Friday, November 21, 2008
Party snacks
Four ingredients to make crispy rice bars include: brown rice crisps cereal, brown rice syrup, natural peanut butter and salt.
The season has come to jump into the kitchen and cook up some holiday goodies. When going to a holiday gathering it is nice to take a snack along to share.
We came across a new recipe for crispy rice bars and they do not even have marshmallows in them. With a few changes to the ingredient amounts, we found it simple and fast to make. And it makes a great snack to share.
To make measuring ingredients easier we increased the amount of the brown rice syrup to use the whole jar. Also we use the whole box of brown rice cereal. This not only saves time measuring ingredients, but there is less items to clean up with less measuring cups used.
The ingredients are not hard to find either. We found the syrup and cereal in the health food section at Raley’s.
Ingredients include:
One 1 pound 5 ounce jar of brown rice syrup
One 10 ounce box brown rice crisps cereal
3/4 cup natural peanut, soy nut or almond butter
1/4 teaspoon salt
In a small sauce pan heat brown rice syrup and salt on low to medium heat until liquefied. Add peanut butter and cook, stirring until heated through but not boiling. About five minutes.
Pour cereal into a large bowl. With a spatula stir peanut butter mixture into the cereal.
Spray a 9 by 13 pan with cooking oil. Press crispy rice mix into pan and let cool one hour.
Cut into 24 bars.
This recipe uses no sugar and is gluten free. Also soy nut butter or almond butter can be used in place of peanut butter for those who cannot eat peanuts.
Optional ingredients can be added such as chopped walnuts or other nuts, carob or chocolate chips, dried fruit bits or small candy pieces. Use 2/3 cup of one option and add when mixing cereal with peanut butter mix.
Last year in our Nov. 9, 2007 blog on party pleasers we listed two recipes we take to many functions. They are no-bake balls and peanut butter balls. These are also no sugar and gluten free recipes. They are both easy to make and no baking is required for either recipe.
Things we look for when trying a recipe are healthy, fast and easy. Healthy because we care about what we put into our bodies. Fast and easy is important because we do not have time for complicated recipes.
When planning a holiday get-together try to include someone who has no family of their own to share the holidays with. It will make the day brighter for them as well as for you.
Friday, November 14, 2008
Fall arrangements
Fall flower arrangements.
Elegant decorations can be quick, easy and simple. That is what we like best. And that is just what we came up with.
While searching the Internet for fresh fall decorating ideas we came across a cute idea at http://www.save-on-crafts.com/cubeproject.html. It was close to what we were looking for but with a contemporary look. It was three Gerbera daisies set individually in three square blocks covered with black and white patterned paper. The above link has directions to make the design they show.
Then we found a similar project at http://craft.dow.com/proj/11118.htm. This one was not fall colors but used moss to cover the tops of the cubes. Their flowers and cubes were also smaller in size.
We wanted something with more of a country style. After thinking about what possible changes we could make an idea formed that resulted in our final design shown.
Our final design used three Gerbera daisies and three large sunflowers, each held up in a chunk of limb wood.
The chunks of limb wood we had from trimmings off of several Sycamore trees in our yard. We cut each piece to have a flat bottom and a slanted top. Then we drilled a single hole in the center of each slanted cut. One larger piece had two slanted cuts on at either end. This one we drilled one hole in the center of each diagonal cut.
Then we placed a single flower stem in each hole and arranged the limb pieces to make our final design.
This grouping is about 30 inches tall and about 16 inches wide at the base. The pieces can also be placed in different arrangements depending on the space to be decorated.
The limb pieces could be arranged in a single line to decorate a mantle or placed down the center of a buffet table. A length of ivy garland could wind in between the limb pieces to dress up the look.
A single limb piece with a flower could be used alone to decorate the corner of a desk or possibly an end table. Raffia could be used to tie a bow around the stem to give it a little more balance.
For more decorating ideas try multiple vases with flowers like our spring arrangement in our Feb. 29 blog. Use fall flowers and fall leaves in place of the spring flowers and ivy. Colored sand can be used in the vases with silk flowers. Our fall vase arrangement is shown above.
Never be afraid to try a new idea. Also try adding a few personal touches. If the results are not something you like try a few more changes until it fits your own personal style.
Next take a picture of your results and share it with us. We love it when readers share their ideas.
Friday, November 7, 2008
Christmas beliefs
“The Judge Who Stole Christmas” by Randy Singer.
Christmas is just around the corner. Some people are dreading it and some can not wait. Some think it is too early to think about Christmas. Others have been thinking about it for months.
Controversies arise each year as to whether or not religious decorations should be allowed or banned. Which songs and greetings are offensive and to whom. Retailers go with what sells the most merchandise. Activists pro and con make headlines.
We recently read a book that is a fictional story but it brings in some of these issues. It is titled “The Judge Who Stole Christmas” by Randy Singer.
The story begins in the sleepy town of
The story is full of characters out to use the situation for their own agendas. Other characters are forced to think about their own personal beliefs and how they want to express them. They also face what it will cost them personally to share their beliefs as well as live them.
The ending is surprising and not predictable. The author’s intent is to provoke the reader to explore what the real reason for the season is. He also wants the reader to think about appropriate ways for individuals to express and celebrate their beliefs.
An in-your-face, I’m right and you’re wrong approach usually is not effective. Not speaking out or expressing personal belief is not right either.
Now is the time to think about how to share personal beliefs about Christmas in a manner that is thought provoking. Not confrontational but welcoming and inviting. Those who want to listen will. Those who do not will at least know where you stand and hopefully respect you for it.
Our personal belief is Jesus is the reason for the season. Celebrating Jesus’ birth at this time is the focus for us. Helping others in need is our way of honoring Jesus at this time of year. We also spend time with family and friends during the season.
What do you focus on at Christmas? How do you express your beliefs? How will you celebrate Christmas? We will share in and welcome any discussion on this topic with those interested. We will not argue but respect the beliefs of others who differ from us.
We challenge everyone to read the book and let us know your thoughts.
Friday, October 31, 2008
Walnuts to market
Craig Love is emptying the nut cart onto an elevator that loads the walnuts into a large trailer. The nuts are then taken to the huller and dryer.
Most of the walnuts are picked up and out of the field but we have people asking what happens to them after that. Here is the rest of the story.
The trucks loaded with walnuts are taken to a huller to be cleaned and dried. The huller is a large assemblage of machinery. The walnuts are unloaded from the bottom of the truck into a pit set in the ground.
From there a conveyer belt moves them up out of the pit and through a water bath. Next they go through a series of rotating cages and brushes where any remaining pieces of hull are removed from the nuts. Leaves and other debris are also removed.
Then they are passed through a device called an air leg. The air leg uses suction to remove empty and shriveled nuts putting them in the throw-away bin. The suction of the air leg must be adjusted for each batch of nuts processed. Different varieties and even similar nuts harvested under different conditions vary in weight.
After the air leg, the nuts are usually run through an electronic color sorter. This device can detect changes in color of the nuts and can kick off stained or blemished ones.
The next step is the sorting table. This is made up of a conveyer belt moving at about counter height. Workers stand on both sides picking out any bad nuts that may still be present. After the sorting table, many hullers use another air leg to further refine the batch of nuts.
Next they are put in bins with warm air blowing through them to dry the nuts. Most hullers have electronic sensing moisture meters that allow them to get the desired amount of dryness. In the past, nuts were usually over-dried, which is fine for the nuts but causes the grower to loose tonnage.
After they are dry, the nuts are again loaded into a truck for shipment to the packer. On the way the nuts are usually run through one to two additional air legs to remove light and small nuts. These are placed in a separate bin. They have found this helps the growers get a slightly better grading of their nuts at the packer. The bins of removed nuts are sent in to the packer separately.
When the truck arrives at the packer, it is first weighed and a sample of the walnuts is taken. The sample is examined for quality, with each nut being checked for size and appearance. Each nut is then cracked and the kernel is then checked for color and quality.
The results of the grading, plus the total weight of that delivery, are recorded onto a grade sheet. Months later, after the market price for walnuts is determined, the grower is paid according to the information on the grade sheet.
The packer then processes and packages the nuts for shipment all over the world. And that is the rest of the story.
Friday, October 24, 2008
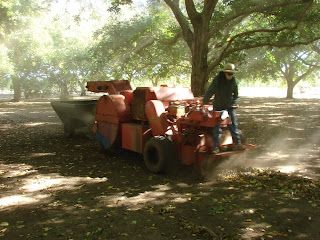
Walnut harvest 3
A 1979 Ramacher pickup machine operated by Charlene Love.
Walnut harvest for us is winding down. We are almost done with the first time through the orchard. Our children even came to help out a couple of days. Extra help is always nice.
Last week we wrote about sweeping walnuts into rows. After that we go over the rows with the stick picker described in our Sept. 28, 2007 blog.
Then the walnuts are finally ready to be picked up. This is done with a pickup machine.
There are two main styles of pickup machines. One is pulled by a tractor that also provides power to the pickup machine. The other is self-propelled, having its own engine. Both types are still made today.
The choice to purchase one or the other depends on mostly how much money a buyer wants to spend, as well as their particular farming conditions.
Before there were pickup machines, walnuts had to be picked up by hand. That was a backbreaking job that required huge amounts of labor for even a small acreage. Mechanical harvesting was an obvious need. The first pickup machines began to be constructed in the late 1950s.
One of our relatives had a very early pickup machine. It was built on a large frame, had six wheels and two small one-cylinder engines. Everything was powered with long vee-belts and pulleys. It would creep down a row getting about one hour between breakdowns. But it did pick up walnuts and that was a major feat for the day.
Today, pickup machines are more powerful and reliable. Most of them come equipped with diesel engines. Some even come with enclosed cabs for the operator. They are efficient at picking up the nuts and separating them from leaves and other debris.
The walnuts drop into a nut cart that is pulled behind the pickup machine as it goes down the rows. When the cart is full, it is changed out for an empty one and the pickup machine can then continue on down the row. The full cart is taken to a truck trailer and loaded onto it with a field elevator.
Many larger farms now use the bank-out type of pickup machine. In that case, the picked up nuts are stored in a permanently attached bin. When the bin is full, a transfer truck pulls up behind the pickup machine and a conveyer belt loads the stored nuts into the transfer truck. All this is done without stopping the pickup machine. The transfer truck then drives to the field elevator, loads the nuts into a truck trailer and then drives back to the pickup machine for another load.
Our pickup machine was manufactured in 1979 by the Ramacher Company, now located in
Friday, October 17, 2008
Walnut harvest 2
Nuts are being blow and swept with a 1983 Weis McNair sweeper operated by Suzanne Love.
Last week we talked about the first step in walnut harvest, which is shaking the trees. Next the nuts are swept into rows down the center of the tree rows to prepare for harvesting. The machine that does that is called a sweeper.
There is quite a variety of sweepers available today. Most new ones are diesel powered, self-propelled units with an air conditioned cab. A cab is nice as sweeping walnuts is a dirty job.
Sweepers can also be installed on tractors. The tractor-mounted sweeper has some advantages in that it is less expensive to purchase, as it has no engine. The drawback is that it ties up a tractor and has to be taken on and off each harvest season.
The first real sweepers were small walk-behind machines with a lawnmower engine for power. It produced a narrow sweep of four feet or less. Sweepers today commonly have sweep widths of eight feet or more. The actual sweep is accomplished by either a rotating rubber flight or a reel arrangement. They are actually much like a hay rake, only smaller.
It became apparent early on that a sweeper going around trees leaves a lot of nuts that must be hand raked. And while the original sweepers did not have them, all sweepers today have air blowers to blow the walnuts out of the tree row. As sweeper engines have gotten more powerful over the years, the blowers have also become larger.
In addition to the sweeper, or perhaps because of it, a second key ingredient in getting a good sweeper job is the condition of the surface of the ground. Ground that is flat, level and weed-free is a breeze to sweep and there will hardly be one lost nut. Sweeping in grass and uneven ground is a challenge and even the best of the new sweepers will leave little piles of nuts in all the ruts and holes.
Our sweeper was manufactured in 1983 by the Weis McNair Company of
We have a spare sweeper to use in case of a breakdown with the Weis. It is an older, smaller sweeper but can get the job done.
Once the nuts are rowed up we run a stick picker through the rows to get the bigger sticks out that came down when the trees were shook. Our Sept. 28, 2007 blog on Walnut harvest talked about the stick picker.
Friday, October 10, 2008
Walnut harvest 1
A 1979 OMC Shaker operated by Craig Love.
Walnut harvest has begun. In some orchards they started more than a week ago but our first day was Monday.
The first thing to do is to shake the trees. When driving by an orchard soon to be harvested, it certainly looks like a lot of nuts on the ground. Even so, it is still necessary to shake all the trees in order to get most of the nuts.
In the past, say before 1950, most walnut trees were shook by hand. Workers would swat the branches with long bamboo poles. Other workers would climb the trees and attempt to bounce up and down on the limbs to get the nuts to come down.
In those days the orchards were generally smaller, with blocks of different varieties taking up only five or ten acres. Labor was cheap in then, which was a good thing because it took a lot of workers to shake an orchard.
The first mechanical shakers were contraptions that attached to the back of a tractor. They had a long arm (15 or 20 feet) with a hook that would catch a large branch. The power was engaged and the arm rapidly pulled back and forth against the branch, thus shaking down the walnuts.
It actually shook the trees fairly well, if the branches were not too large. But it was time-consuming to have to reposition the tractor for each branch and the hook could do a lot of damage to the branches if not handled just right. Plus, a team of workers were needed to rake the nuts out of the way so the tractor could move without running over them.
About 1965 or so the first self-propelled hydraulic shakers were produced. These were a great improvement over the older systems. They were built on pickup chassis modified to hold the shaker apparatus. They were driven right up to the tree and the limbs were grabbed with a hydraulically-operated clamp.
The shaking was done with a hydraulic motor which moved rotating weights via a long belt. The wheels had rotating sweepers to keep from running over nuts. The first ones were not too effective, but the idea has been continually improved upon since.
The shakers of today bear some similarity to the older ones but are greatly improved. The most striking difference is that the newer shaker models are on three wheels instead of four. This gives them greatly improved maneuverability. And, because labor costs today are so much higher than in the past and technology is comparatively much cheaper than it used to be, every effort is made to automate and reduce labor requirements.
The cabs are air-conditioned and sound insulated with complete stereo systems. The shaker pads are self-lubricating and water cooled so that the operator does not have to get out and grease and change them every 20 minutes or so. It is said that one of the newer air-conditioned shakers is as effective as two of the old ones. There are new models of shakers out now, one of which is called “The Bullet,” that can shake five to seven trees a minute!
Our shaker is a 1979 model, built by OMC Corporation. It has the three-wheel stance instead of the older four-wheel types, and is fully hydraulic. It does not have an air conditioned cab, however, which at least is one less thing to have to repair.
The operator is separated from the engine only by a piece of 3/4-inch plywood. This makes this machine rather loud and hot to run. It has a hydraulic system for the shaking which also runs an older style of wheel sweeps. This shaker works out well for our trees, which are older and very large.
It takes a large farming operation to be able to afford and utilize a new shaker. We can take a little extra time and still be able to use our older shaker.
We will share more about the process of walnut harvest next time.
Friday, October 3, 2008
Adoption
Pictured are some of the brochures available with adoption information.
Adoption for some brings good memories and for others it brings bad memories. Today adoption is handled much differently than in the past. It is a unique experience for each individual birth parent and adoptive family.
There are more choices available along with help to make those choices. Bethany Christian Service is one place that offers that kind of help. We recently learned that they have a new office in
Bethany Christian Services is based in
Counselors help birth parents explore the options available to them. The move today is toward openness for those who choose adoption. This is where the birth parent and adoptive family stay in contact in some form. It could be from letters and pictures to direct contact either by telephone, e-mail or letter. It could also involve face to face visits.
The birth parents can have the joy of knowing they chose a quality life for their child. They will be able to choose the adoptive family. Also they can also know their child is growing and developing as they continue some form of contact.
The counselors are there to answer all questions as the birth parents explore what is right for them. They help them make a plan they can live with long term. The agency also handles all the legal details and there is no cost to the birth parents.
Birth parents can also meet with others who have chosen adoption for their child. They can ask questions and listen to their experiences. Families that have adopted a child are also available for them to meet with and to answer questions about how they see the process.
If the birth mother is in need of housing during pregnancy there is a home for them to live at. There is one of these homes located in
The services provided there are all free and include: counseling, childbirth classes and labor support, referrals for community and education programs, arrangements for prenatal care, assistance in obtaining Medi-Cal coverage, clothing and personal hygiene products, bus passes or transportation assistance.
They can accommodate up to six residents at a time. There is a laundry room and supplies are provided. A telephone is available for local calls. Phone cards are required for long distance calls. They also serve healthy and nutritious foods.
Spiritual needs are also addressed. The ministry is operated and funded by local churches and individuals. Residents and staff attend weekly worship services. If a resident is of a different faith, she is welcome to attend a service of her choice. An in-home Bible study is also available.
Always be informed and make a choice that can be lived with long term.
Brochures that help answer question for birth parents are available at Care Net Pregnancy Center, 127 Main Street, Red Bluff, CA. Their phone number is 530-528-8112. Walk-ins are welcome for free pregnancy tests as well as information on all options available to pregnant women. Appointments are also available.
The Bethany Christian Services local office is at
Friday, September 26, 2008
Gift boxes
Gift box made from facial tissue box covered with twisted paper ribbon and lined with fabric.
Customizing a gift box to go with a special gift is like giving two gifts in one. It tells the recipient that they are extra special. They are important.
One gift box we like to make is using a facial tissue box. We cover it with twisted paper ribbon and line it with fabric. Any size tissue box can be used but the larger ones are what we use most.
We started making these for fundraisers to raise money for charity groups back in the 1990s. Since then we have made many to add a personal touch to gifts we give. Another version we have seen were done around a paper grocery bag. Also the top can be left off and a handle added.
Here is a list of materials used to make the gift box pictured with this article.
Two boxes the same size plus one extra bottom.
Ten yards of twisted paper ribbon.
About one half yard fabric for the lining.
One yard gathered lace to go around the lid.
One and a half yards of quarter-inch wide ribbon to go around inside edges.
Also a variety of ribbons, silk flowers or other ordainments are used in decorating the box top.
Hot glue gun or craft glue is used to assemble the box.
To cut the right lengths of twisted paper ribbon hold one end and wrap it around the box. First go around all four sides. Cut three to this length. Next go from front top edge, around the bottom and up to the back top edge and add one inch. Cut six this length. Then go from left top side edge, around the bottom and up to the top right plus one inch. Cut three this length.
For the lid cut three that measure the long way plus one inch. Then cut six for the short way plus one inch. The plus one inch is so there is a half inch on each side to fold under. Untwist all cut pieces.
Cut the top off the first box and discard. Weave the paper ribbon pieces starting at the bottom. Then weave in the sides. Glue edges of ribbon over the top edge of the box.
Weave the lid pieces and glue edges to the underside. Glue gathered lace trim just under the edges.
Cut apart the sides, bottom and top of the second box. Discard the top. From a third box cut off the bottom and discard the rest. These pieces are used to line the box and make the lid.
Set aside one bottom to make the top of the lid. The rest of the pieces are laid on the fabric. Cut one piece of fabric for each piece with about one-inch seams on all sides. Wrap the seams to the back of the pieces and glue in place.
Cut one more piece of fabric to lie on the inside bottom of the box and add one inch to each side so the edges will go up the sides when placed in the box. Notch corners of fabric to ease fitting. After bottom piece is placed glue the sides in.
Glue the covered box bottom to the bottom of the lid. Cut a hinge from fabric and sandwich between top and lining and box back and lining.
Decorate the top with ribbons, silk flowers or other desired trims. Finish off inside edges with ribbon if desired.
Every box we make is different. There is no right way or wrong way to decorate a box. We hope this sparks some ideas for many gift boxes to come.
Friday, September 19, 2008
Marriage takes three
Framed copy of “Marriage Takes Three” poem by Perry Tanksley.
Love will keep us together. We will live happily every after. Nothing will separate us. We are soul mates.
These are phrases we hear couples who are about to get married say all the time. So how come over half of marriages end in divorce? Even Christian marriages fair no better.
Christians have a better than average chance at making marriage work. That is if they remember that marriage takes three. This means to let God be a part of their marriage.
There is a poem written by Perry Tanksley titled “Marriage Takes Three,” that says it all. A framed copy was given to us as a gift when we were married. It states:
I once thought marriage took
Just two to make a go.
But now I am convinced
It takes the Lord also.
And not one marriage fails
Where Christ is asked to enter.
As lovers come together
With Jesus at the center.
But marriage seldom thrives
And homes are incomplete
Till He is welcomed there
To help avert defeat.
In homes where Christ is first
It's obvious to see,
Those unions really work,
For marriage still takes Three.
Also, if we remember to love our spouse as God loves us things would go a lot smoother. We would never be too old to hold hands and would never go to sleep angry. When things get tough we would stand firm and face the world together with God’s help.
Our circle of love would include our whole family. We would remember to speak words of appreciation and demonstrate gratitude in thoughtful ways. Best of all we would have the capacity to forgive and forget.
The question would not be did we marry the right person. It would be are we being the right partner.
In the business of life we forget to share our marriage with God. Asking for his guidance and help is a key part of having a strong marriage. There is a simple way to pray together. It includes just two steps and takes longer to explain than to do.
The first thing is to thank God for one thing that you value in your spouse. Some examples are: that they are a good cook, good provider, good with the children or even that they have forgiven you something.
Second ask God for something for your spouse. Examples of this are: to help them have a good day at work, for wisdom in dealing with coworkers, energy to keep up with the children or for good health.
Keeping prayer time with your spouse to these two things avoids many pitfalls. Some partners tend to preach to their spouse while praying. This is a big no no. It is God’s place to work on our spouse’s faults, not ours. Also, if we are listening to God, He will help us focus on and work on our own faults.
Our prayer as a couple to God is: thank you God for helping us through 28 plus years of marriage and please help us be a good example to others who want to have a great marriage.
Friday, September 12, 2008
Building a computer
Inside of custom built computer.
Build our own computer? Are people really allowed to do that? Yes and as a matter of fact building our own computer was an enjoyable way to get a good system at a reasonable price. In truth, there are a lot of ways to get a computer these days. A good computer can be purchased at just about any large retailer, computer shop or online. And the prices we pay keep going down. The same cannot be said for very many things these days. So why did we go to all the trouble to build our own machine?
We found that by building it ourselves, we were in complete control of exactly what components were used. Often mass-produced computers use the cheapest parts they can get. They may have a highly recognizable name, but inside they are usually the lowest common denominator. In building our own we bought parts specific to our needs and could shop for the best bargains on each part.
For instance, if more video processing is needed, such as for video editing or gaming, a more powerful video card can be purchased. Most low cost computers are going to perform average at most things. We found that the end result in building our own was a computer with the performance of a much more expensive model at the price of a low end one.
To start we researched the various types of computer parts available and decide what kind of computer we wanted. Our decision was to make one that had good video processing power, as well as a fast Central Processing Unit speed. There is a huge array of computer parts available, mostly from online retailers.
One of the better sources for information that non-engineers can understand is a web page called My Super PC. It is located at http://www.mysuperpc.com. It is written by a person who has built several computers and has extensive information about various components, prices and the best place to purchase them.
Next we went online to purchase our parts from a well-known retailer. They arrived in about a week well packaged in a huge amount of foam peanuts. Nothing was damaged, so we could begin the fun part – assembly. The first thing to do is to read the enclosed information cards and manuals for the various parts, especially the motherboard. They provide step-by-step directions for putting everything together. It does not require a computer programmer or engineer to do this.
Everything is laid out in the directions and most things just plug together. The one thing that can easily mess up an otherwise good computer assembly is static electricity. Such discharges can run many hundreds of volts and can instantly fry sensitive computer parts such as the motherboard and memory sticks. An anti-static wrist band that connects to the computer frame is a must. They can be purchased at most electronic parts stores.
After assembling the parts and making all the connections, it was time for the first power up. It is always exciting to see what was at first just a disorganized assortment of parts come to life and do something. We then loaded the Operating System. For that we selected Windows XP, which is not the latest but has proven to be a good and stable OS. Next we loaded all the “drivers” necessary for the various hardware components, such as the video card, CD drive, etc. A driver is a small program that the computer runs in order for it to know how to interact with the different parts. There can be quite a few of them, but they are all included on the component manufacturer’s disks.
That is all there is to it! We are now enjoying our custom built computer that does just what we want it to.
Friday, September 5, 2008
The lawn obsession
“The Lawn: A History of an American Obsession” written by Virginia Scott Jenkins.
Many American people are obsessed with their lawns. Homeowners spend billions of dollars not to mention countless hours and energy on their lawns every year. Some so much so that they have riding mowers that they drive back and forth across acres of front lawn.
Author Virginia Scott Jenkins was so curious about these facts that she researched the history of the obsession with lawns and then wrote a book about it titled “The Lawn: A History of an American Obsession.” In her research she went back to before people had lawns. She also found the definition of a lawn has changed over the past 400 years.
In the 16th century the term “lawn” was used to describe an open space or glade in the woods. By the 17th century it was used to refer to a stretch of untilled ground covered with grass. Then in the 18th century it came to mean a portion of a garden covered with grass and kept closely mown.
In the
The book is divided into two parts. The first is that Americans have adopted the front-lawn aesthetic. The second is on the democratization of the lawn.
In her research Jenkins found that before the Civil War very few Americans had lawns at all. Houses in town were built close to the street with perhaps a small fenced garden. Farm houses had tended to be surrounded by pasture, fields, gardens or just bare ground. Many old paintings or woodcuts produced during that era do in fact illustrate that houses had no lawn.
Domestic front lawns are unique to the
Jenkins book has a section with pictures, most of which are of advertisements for lawnmowers. The earliest advertisements showed young women pushing the lawnmowers in the hopes they would appeal to male customers. Other advertisement posters were for grass seed, chemical fertilizers, pesticides and herbicides. Mother Nature was not mentioned.
The first lawn mower was patented in 1869. The industry grew to be a multibillion-dollar venture serving homeowners from coast to coast. Lawns are used to beautify everything from graveyards and factories to highways and parks all the way to the White House.
Today some changes are being made in part due to the amount of water needed to maintain a lawn. Another consideration is more privacy is desired and so more fences are going up making lawn areas less accessible to the general public.
The conclusion seems to be that it is yet to be seen if lawns will become a thing of the past. Either way it is interesting to read about the growth of the idea of a lawn to the industry that makes millions from the effort to maintain them.
Friday, August 29, 2008
California waterways
Model of a typical stage station, used to monitor river water levels and provide warning of floods.
This last weekend we went to the California State Fair in
One display that caught our attention was regarding the Sacramento-San Joaquin Delta. It was very informative and included a number of excellent visual demonstrations. There were also a number of brochures outlining facts about the delta. It seems that the delta these days is being faced with a number of challenges.
The delta as it exists today is controlled by a system of manmade levees, many of which are over 100 years old. They started out as a way to manage flooding of farmlands and houses. Since 1914 they have been regulated by the State Reclamation Board.
Today they also exist to control drinking water for 25 million people, support
Recreation is another thing it is used for by over 12 million visitors annually. There are 290 shoreline recreational areas, 300 marinas and about 500,000 boaters. Sport fishing is also a big concern.
The two main rivers that feed the delta are the
Over the last several years the Sierra snowpack has been below normal which allows for less runoff than normal during the summer. That runoff ideally is what keeps the river levels constant and thus keeps saltwater out of the delta.
Also, at the same time, many of the levees that surround the delta islands are getting older, some of which are in a state of decline. Levee breaks can be disasters of the first order, inundating homes and farms but also diverting some river water which in turn allows the salt water to move up into the delta.
There is a lot of controversy these days over what to do about the delta. The state assembly is constantly addressing legislation regarding the delta. Maintaining the delta is an expensive proposition and must rely on cooperation from much of the surrounding areas, mainly those areas the rivers flow from.
One brochure in their fact list stated: “Delta waterways are the single most important geographic feature of the State’s water resource system.” Maybe they should think again and state that it is one part of many in the state that is important to the State’s water resource system. Partnering with the other areas of the state instead of saying they are the single most important feature might get them further down the road to a workable solution.
Things like building more dams and other ways to control and maintain constant water flow may need to become a reality. These items need serious consideration and action if long term solutions are to be reached.
Trying to highlight the delta as the single most important water feature in the state is a mistake. But we have seldom seen any government project have long term success. At least we can not think of any recent ones.
Coincidently an article headlined “Local water leaders get look at DeltaVision” was on the Enterprise-Record website Tuesday, August 26, which addresses similar issues. We think it is worth reading. Maybe the Daily New will consider running this article if it hasn’t already.
Friday, August 22, 2008
Neighbor helping neighbor
Name brand baby clothes in near new condition purchased in thrift store.
Does your neighbor need help? Who is your neighbor? These are questions many try to avoid so they do not have to deal with the problems of other people.
We consider our neighbors to be anyone we know that has a need. If we can not help them directly we try to find someone who can. There are many volunteer organizations in our county that offer much of that type of help. It does however take the contributions of many locals to make that help possible.
Contributions can be given in several different forms. Money is always a welcome one but not one everyone is able to contribute. Several other types are services which require the gift of time and the gifts of donated items which may be new or used but still in good shape.
Volunteer organizations generally have the ability to reach out to a greater number of those in need than an individual does. They have the knowledge and experience it takes to find out how best to help those in need. Many organizations also help those in need by teaching them how to better help themselves.
One such place locally is the
For the clients who want to keep their baby but find it difficult to deal with the added expenses a baby brings, the clinic has a store of baby items from clothes and baby furniture to diapers and wipes. These are all donated items the people within the community donate.
No item in the store is sold for money but for points earned by the clients. There program is called “Earn While You Learn.” The clients choose from a list of topics they would like to learn more about such as nutrition, the stages of pregnancy, how to care for a baby, Bible studies that deal with spiritual issues, learning about the effects of alcohol and tobacco use during pregnancy, handling finances and more.
After a client decides what topics they want to learn about appointments are set up on a regular basis for those studies. Points are received for each study they complete. The points are then what they spend in the store for items needed for their baby.
Individuals who donate items for the store are in turn helping their neighbors. Perhaps not the neighbor on the other side of the fence from them, but maybe one that is down the street or across town. Not only is the donated items an immediate help but the information in the education provides long term help.
Donated items given to the store need to be clean, stain free and in good repair.
We recently went thrift store shopping, which happens to be one of our favorite hobbies. While shopping, we found several cute, barely used baby boy outfits that were on sale for pennies on the dollar. They ranged from about .95 cents for the one piece outfits to $1.75 for a name brand shirt and overall set. We had fun and were able to help someone out all at the same time.
More information on Care Net services or needs is available at 528-8102.
Friday, August 15, 2008
Margin for overloaded lives
Life today is hectic – ask anyone. There is hardly enough time to catch our breath before having to move to the next thing. Even though we live in Red Bluff, which is described by some as a “nice little town,” everyone is busy. There is no time to step back and think. Many feel overloaded.
To help remedy that, we read a book called “Margin,” by Dr. Richard A. Swenson. Swenson is an internationally known lecturer and author of six books. He is a medical doctor, practicing and teaching in
Pick up any printed book or newspaper and notice the white area around the edge of the pages. That is the margin. The reason the publishers do not print on the page edge to edge and top to bottom is that it makes it very difficult to read. They could get a lot more in, but nobody would want to read it. A certain amount of unused space is necessary. Life is like that too. We cannot live our lives successfully if there is no buffer, no gap or a place to recharge. The space between what we must do and all we possibly could do is our margin. The idea behind this book is to understand why margin is important, how we lost it and how to get it back.
The book is divided into three parts, the first of which discusses the problem of pain. Swenson is not talking about physical pain, although that may be present. He is primarily focusing on the pain of life – such as the pain of progress, of stress, of problems. Who is not “stressed out” these days? Who does not sometimes wish that the progress made in the last 25 years or so could be rolled back? As useful as some of the new electronic gadgets and other things can be, everything has a down side and that is what causes us the pain.
The second part of the book is titled “The Prescription: Margin.” In this section margin is discussed and applied to various life situations. According to Swenson, margin is what we have left over after we take care of all of our obligations and commitments. It is what we have in reserve. It is what we can draw on to deal with the things life throws at us.
We need margin in all areas of life in order to live without pressure. There is of course a need for margin in our time. We cannot schedule every minute of the day and still feel focused and productive. But we also need some margin in our finances, our physical and emotional energy.
Finances are a major contributor to pressure and stress for individuals and families. It is well known that most marriage problems are at some point related to finances. Not everyone can be “financially independent,” but we can all reduce our debt, put off purchases until we can pay cash, save and give some.
The third part of the book talks about what the future will look like if we make and keep some margin in our lives. Various areas of health are pointed out; health through contentment, simplicity, balance and rest. Who does not want that?
The point the author makes is that we cannot have these things if we keep living our lives the way we always have, or the way our society tells us to live. We have to make some changes. And for most of us, that usually means getting rid of something.
Maybe we should work less hours, be involved in one less social activity so we can spend more time at home loving our children. It may require moving to a less expensive home, driving a cheaper car or even turning down a promotion at work that requires a lot of overtime. But as difficult as those choices may be, not making them may in fact be even more harmful.
This book is a great read. But for those who are not readers just applying the principles outlined above is a good start on a more satisfying life.
Friday, August 8, 2008
Walnut-oatmeal burgers
Easy to make walnut oatmeal burgers make a great tasting meal.
Walnuts and oatmeal are two main ingredients used to make meatless burgers in a new recipe we tried recently. Many readers are now rolling their eyes and moving on to another article but we say these burgers are worth trying. They taste very good and are easy to make.
We came across the recipe for these burgers in the “Southern Living 1996 Annual Recipes” book. The first time we tried it we stuck to the ingredients as listed. It was good but we decided to customize it with a few more seasonings. They remind us of meatloaf.
Here is our version of the recipe.
Ingredients:
2 large eggs
3 tablespoons water
1 cup quick-cooking oatmeal, uncooked
1/2 cup finely chopped walnuts
1/4 cup finely chopped onion
1/4 cup finely chopped green pepper
1/2 teaspoon celery salt
1/2 teaspoon rubbed sage
1/4 teaspoon pepper
1 clove garlic, pressed
2 tablespoons grape seed oil
1/2 cup water
Combine the eggs and three tablespoons water in a large bowl and beat with a fork. Add oats and next seven ingredients. Shape mixture into four patties. Note: the salt can be reduced or left out for those on restricted diets.
Pour oil into a large skillet and heat over medium-high until hot. Add patties and cook three minutes on each side, or until lightly browned. Add half cup water and cover. Reduce heat and simmer for 10 minutes or until water evaporates.
Burgers can be served on buns with all the regular fixings one would use for regular burgers. Another option is to serve them `with noodles or mashed potatoes and a favorite vegetable or salad.
Our suggestion for desert is a peach-blackberry crisp. These are two fruits that are in season now and make a good combination. Below is one recipe we use.
In a 13 by 9-inch baking dish layer the peaches and blackberries with about three tablespoons of minute tapioca and two teaspoons of cinnamon mixed in. Use enough fruit to fill the dish about two-thirds full.
For the topping mix the following ingredients:
1 cup granola
1/2 cup chopped walnuts
1/2 cup unsweetened shredded coconut
1/4 cup honey
1/4 cup margarine
Spread topping mixture over the fruit layer. Bake at 350 degrees for about 35 minutes.
We shared our recipe for homemade granola in our June 29, 2007 blog. Also a two-serving fruit crisp recipe we use was in our July 20, 2007 blog. Both are posted on this site.
Making healthy food choices does not have to be difficult or lack taste. The above recipes are not only healthy choices but are easy to make and taste great also. It does take a little planning to purpose to eat healthy but once the habit is formed it is easy to stick with the change. We encourage everyone to give it a try one recipe at a time.