Friday, December 28, 2007

Meal planning

Three books that can help in meal planning.

The New Year is just a few short days away. Many will be making New Year’s resolutions. They may include weight loss, better nutrition, getting more organized and sticking to a budget.

To help keep these resolutions we propose planning and making meals in advance. This will help achieve all the above goals and also will save time and make meal time something to look forward to.

With busy schedules families often run out of time to plan nutritional meals much less do it on a budget. There are cookbooks that have suggestions, recipes, menus, shopping lists and more that make this doable.

Cookbooks are tools to be used to make the job easier. There are three that we have used to help us come up with our own style that is a combination of methods they suggest.

“Once-a-Month Cooking” by Mimi Wilson and Mary Beth Lagerborg gives menus, shopping lists, recipes and instructions on how to prepare meals for two weeks or a month at a time. This method is best if there are two or more people working together. We have used this method and it is a lot of work up front but the reward comes when all we had to do was defrost and heat meals that were already assembled.

“Don’t Panic-Dinner’s in the Freezer” by Susie Martinez, Vanda Howell and Bonnie Garcia focuses on preparing one or two meals at one time in multiples of two, four or six. Each recipe in the book has the ingredients listed to make two, four or six meals at a time. Then after it is cooked it can be divided that many times and frozen. That way one meal can be used that day and the others will be ready when needed.

“The Cook It and Freeze It Book” by Margaret Deeds Murphy has information on how to package different types of food for freezer storage as well as recipes that can be made and frozen. It also gives suggested length each item can be stored in the freezer.

Most of the time we make double or triple the amount we need for a meal and freeze the extra meals. We also do things like make a big pot of beans or a big roast that can then be used to make several different recipes.

About a month before our walnut harvest time we push to do more of a once-a-month type plan where we can have enough meals to last us through harvest. That way when we come in from the orchard at night tired from the day’s work all we have to do is heat up dinner and eat.

This year we ran a little short of our desired goal. There was another alternative we decided to use. In Red Bluff there is now a business called “Dinner My Way.” They have all the ingredients needed for 14 different recipes all ready to be assembled. We ordered online the meals we wanted and made reservations to go in and assemble them. In about an hour we had the additional meal we needed put together and ready to freeze. Information about all they offer is available at dinnermyway.com.

Many families have children in sports and other after school activities. That along with both parents working can make it hard to prepare meals that are nutritional as well as meet the budget. Getting the entire family to participate in a meal preparation plan will make it possible to have meals that meat the nutrition and budget goals.

When one person of the family is to be the main one responsible for making the meals, the easiest way is to make multiple batches on one meal and then divide it to be frozen for later meals. A good plan is to work up to cooking only one meal a week and use previously made meals the rest of the week.

Do not be afraid to try different methods. After trying the different ones you will be able to customize a plan that works for your family. The goal should be to make meal planning less stressful.

Friday, December 21, 2007

Handmade Snowmen


Small and large handmade snowmen.

Christmas is almost here. Some are still scurrying around to find that last minute gift or decoration. We like to use homemade snowmen as decorations as well as gifts.

They are fast and easy to make. All are different and unique. They can be made in any size. The body is white fabric. Knit or stretchy fabrics are easier to work with.

Buttons, beads, pom-poms, fabric paint and fabric can be used to make the face. A strip of fabric can be used for the scarf. The hat can be made out of fabric that matches the scarf or even from the leg part of a wooly-winter sock.

Twigs or small branches from a tree can be added for arms. To finish add a few buttons on the front.

All items used to make the snowmen can be recycled from discarded clothing. For the snowman’s body a leg can be cut from an old pair of white pants. Or an old white t-shirt or sweat shirt will work as well. Besides fabric or an old sock for the hat, a sleeve from an old sweater will work just as well. The scarf can be cut from an old sweater or flannel shirt.

For the large snowmen pictured above we started with a 13 by 17-inch piece of stretchy fabric. Putting the right sides together we sewed the 13-inch side together forming a tube. Then we attached a six-inch circle for the bottom. After stuffing we ran a gathering stitch at the top and pulled it together to close the top.

The small snowman pictured above is made with a nine by 12-inch piece of white fake fur fabric and a four-inch circle at the bottom. It also has twigs for arms.

To make the hats we used knit fabric. We just measured around the head for width and estimated the amount needed for the height plus about an inch to fold at the bottom edge. The top of the hats are gathered together with a running stitch.

We stuffed our snowmen with polyester fiberfill but other things can be used for stuffing as well. Even dried beans or rice can be added at the bottom to make them stand up better.

Creativity comes from just trying different things. There is no right or wrong way to make a snowman.

These snowmen also make good last minute gifts. We have used them as exchange gifts, house warming gifts and as a hostess gift. To us a handmade gift is extra special.

Besides fabric snowmen we have ones made from wood and ceramic that we set out for the Christmas season. They are also a decoration that can be left out through January. We like to leave them out after other Christmas decorations are put away. That way the house doesn’t look so bare after Christmas.

Another gift idea is to give some of those jams, jellies and apple butter canned during the summer. It is still not too late to make apple butter for the holidays. We looked at easy crock pot recipes on the internet and found many. The following is one of 68 from cooks.com:

Put three quarts of apples, sliced thin, in a crock pot and cook overnight on high. Next morning add 2 teaspoons cinnamon, 3 cups sugar and 1/2 teaspoon cloves. Cook all day on low. Tastes like old-fashioned apple butter that is cooked in copper kettle.

You can use applesauce if you do not have time to prepare the apples. The crock pot makes it possible for apples to cook a long time without being stirred.

We welcome readers to share their homemade gift ideas.

Friday, December 14, 2007

Bread making


Animal shaped bread loaves.

During the winter we make almost all our bread. For one thing, it’s something productive to do when it is raining outside, and it serves to warm up the kitchen. Often we like to experiment with different kinds of bread. The same old kind every day gets to be boring for us.

Basic white is OK if you want something to make a sandwich with. But usually we like something with a little more pizzazz. There are books and books on making bread of which we own our fair share. They are interesting to read even if we do not use many recipes from them.

But this is the Neighbors column after all so we would like to share one of our favorite bread recipes. It is called Colonial Bread.

Ingredients for bread:

1 package yeast

3 1/2 cups flour, unbleached

1/3 cup yellow cornmeal

1 1/2 cups boiling water

1/3 cup molasses

1 teaspoon salt

1 tablespoon butter or margarine

Directions:

Place cornmeal into a bowl. Stir in boiling water, making sure there are no lumps. Let stand to cool for about 30 minutes. Stir in molasses, salt and butter. Place in mixer bowl and add yeast. Add flour until dough cleans the sides of the bowl. Let rise until double, then shape into loaf and let rise again. When doubled, bake in a 390 degree oven for 25 to 30 minutes. Bread is done when brown and sounds hollow if tapped. Recipe may be doubled to make two loaves.

Making bread is a great way to involve the children in household activities, cooking in particular. Sometimes we make the bread into animal shapes or other fun things, like braiding or tube loaves. Shaping bread to match a party theme is also fun. Children love anything out of the ordinary.

Making hamburger buns was a challenge until we ran across this tip a few years ago. Our problem was that the buns would rise so much they looked more like a tennis ball than a hamburger bun. The solution is to put a cookie sheet on top of them after shaping the buns and placing them on the baking pan. This helps to prevent them from rising too much. Remove the cookie sheet just before placing them in the oven to bake. That way when they bake, they raise some but not too much.

Once we were talking to some friends a few days after Thanksgiving. The discussion was regarding the use of turkey leftovers. Someone said that sourdough bread makes a great turkey sandwich. Our comment was that sourdough is great but is rather complicated to make compared to regular yeast bread. They looked at us like we were from another planet or something. But in reality, bread making is not very hard at all and the rewards of eating fresh-baked bread with melted butter make it all worth it.

Other favorites we make often are rye and French bread. Variety is the spice of life so try a different flavor of bread than the normal choice this week. We welcome everyone to share a favorite recipe.

Friday, December 7, 2007

Give encouragement

Presents for Christmas.

Are you ready for Christmas? That is the question we hear all the time these days – in line at the store, talking to friends on the phone, just about anywhere. What they mean, of course, is do we have the house decorated for the holidays, have we got Christmas dinner planned, and especially, do we have all our gift shopping done. For many people the gifts they give and hope to get on Christmas is what is important.

We try to focus on the real spirit of the season and give to those who are in need. Local service organizations, churches and the like all need our donations to be able to keep providing the help and services that they offer. They may utilize volunteer workers, but fuel, food and supplies are expensive. And it seems like things are always going up. In that light monetary donations are greatly needed as well as the workers who volunteer their time.

Volunteering is the gift of time. There are many ways to volunteer right here in Tehama County. One could be involved in a service club. There are several to choose from, all with their different focuses. There are youth organizations, after-school clubs, sports teams, a child’s or grandchild’s school classroom and other school functions, all which need volunteer help.

Nearly all churches function in a large part through the efforts of volunteers. They may have a paid pastor and one or two paid staff positions, but it’s the volunteer workers that make the difference. There are a number of local programs that work with the homeless and others less fortunate. These programs are almost entirely run by volunteers.

There are senior citizen services that are always looking for people to help. The activities range from taking seniors shopping, to the doctor or providing free services such as tax preparation or legal advice.

And we don’t necessarily have to formally volunteer or donate to an established cause. It’s just as important to help our neighbor in need. Take a casserole or some cookies to someone who could use a little help in food preparation. Visit a disabled person who has trouble getting out but would like some company. Offer to do childcare for a single parent.

A husband and wife working together to help others brings an increased sense of togetherness as a side benefit. It is also good to involve children in volunteer activities. This gives them an awareness of others and the ability to emphasize with those in need. The experience can be life-changing for those who receive the help as well as those providing the help.

There was even a time when all the neighbors worked together to get the harvest in. It was too big a job for any one person to do, but by working together they could get everyone’s land harvested in time. It’s the same thing today. There are a lot of needs in Tehama County, and working together we can meet them.

Whether it is time, money, a few kind words or a helping hand, the gift of encouragement is something that will mean a lot to the one receiving it. Make a difference today by having a giving attitude, not a getting attitude.

Friday, November 30, 2007

Christmas decorations


Pictured are Christmas trees cut from walnut logs and decorated with garland, stars and lights. At front are ceramic figures of Mary, Joseph and baby Jesus.

Many holidays have two sides, pagan and Christian. Christmas is one of them. For years they have coexisted but more and more there is a big push to rid any reference to Christianity from the holidays. Yes, everyone must choose for themselves, but to force the issue is dangerous either way.

Most symbols of Christmas have a secular meaning and a Christian meaning. The original meanings have been changed over time to where not many people know what they symbolize. Today the choice of what to use as a decoration is usually done with what is pleasing to the eye and not with symbolism as the main emphasis.

Historically for pagans the Christmas tree was part of the feast of Saturnalia - the birth of the Sun in the sky at the Winter Solstice. For Christians the Christmas tree represents the celebration of the birth of Christ.

The custom of gift-giving on Christmas goes back to Roman festivals of Saturnalia and Kalends. In the beginning they were simple items such as twigs from a sacred grove as good luck emblems. Later they used food, small items of jewelry, candles and statues of gods as gifts. To the early church, gift-giving was a pagan holdover that was frowned upon. However, some justified gift-giving by relating it to the gifts given by the Magi to Jesus, and from figures such as St. Nicholas.

Santa Claus today is fat, jolly, has a red suit trimmed in white fur, usually carries a sack of toys, his sleigh flies through the air, pulled by eight reindeer - Dasher, Dancer, Prancer, Vixen, Comet, Cupid, Donner, Blitzen. His visits occur on Christmas Eve after everyone has gone to bed. This is when he leaves gifts under the Christmas tree and in the stockings for good children. He enters the house through the chimney. This is far from St. Nicholas who was known for giving gifts to needy children.
Poinsettias are from Mexico. The Mexicans in the 18th century thought the plants were symbolic of the Star of Bethlehem. Thus the Poinsettia became associated with Christmas.
The Druids used mistletoe to celebrate the coming of winter. They believed the plant had special healing powers for everything from female infertility to poison ingestion. Scandinavians thought of mistletoe as a plant of peace and harmony. They associated it with their goddess of love, Frigga. The custom of kissing under the mistletoe is believed to come from this belief. The church fathers banned the use of mistletoe and suggested the use of holly as an appropriate substitute for Christmas greenery.

The abbreviation Xmas used for Christmas is of Greek origin. The Greek word for Christ is Xristos. In the 16th century, Europeans began using the first initial of Christ’s name, “X” in place of the word Christ in Christmas as a shortened form of the word. Later Christians who did not understand the Greek language mistook Xmas as a sign of disrespect. Today in fact the abbreviation is used by some who think they are eliminating Christ from Christmas.

Decorating for the Christmas holidays is in full swing along with debate of what the meaning of each decoration is. Should extra care be taken to scrub the holiday of all Christian symbols? Do we even agree what is a Christian symbol and what isn’t? What about the future. Will this lead to restricting or banning the practice of Christianity altogether? In some countries it has. Will ours be next?

Friday, November 23, 2007

Leftover uses


Squash lasagna uses Thanksgiving dinner leftovers.
Traditions at holiday time usually include family getting together, eating a traditional meal and even watching a parade or sports games on television. Some would not even consider doing it any other way.

Our holidays are not always celebrated in a traditional way. Sometimes we are by ourselves for the holidays. With children grown and busy with their own lives they do not always come on the traditionally celebrated days. We choose to coordinate with them and pick a day that works for all of us.

When we hear of others that have no family to be with we invite them to join us. For us flexibility is the key to having good holiday gatherings.

Many who had a traditional Thanksgiving meal yesterday are now looking for ways to use the leftovers. Turkey and winter squash or pumpkin leftovers are great in this lasagna recipe. Our favorite winter squash is butternut but others work just as well. For those who prefer a vegetarian meal the meat can be left out.

Ingredients include:

2 tablespoons olive oil

2 onions, chopped

2 pounds Swiss chard or kale, tough stems removed, leaves washed and chopped

1 teaspoons salt

1 teaspoon black pepper

1 teaspoon sage

1 teaspoon nutmeg

3 cups winter squash or pumpkin, cooked and pureed

1 1/2 cups heavy cream

1 1/2 cups grated Parmesan

1/2 cup milk

9 cooked lasagna noodles

1 1/2 cups chopped turkey or chicken meat, cooked

Cooking directions:

In a large frying pan, heat the oil over moderately low heat. Add the onions and cook, stirring occasionally, until translucent, about 5 minutes. Increase the heat to moderately high and add the chard, 1/2 teaspoon pepper, 1/2 teaspoon sage, and 1/2 teaspoon nutmeg. Stirring until the chard is wilted and no liquid remains in the pan, 5 to 10 minutes.

Heat the oven to 400 degrees. In a bowl, mix together the pumpkin/squash, cream, 1/2 cup Parmesan, 1 teaspoon salt, and the remaining 1/2 teaspoon pepper, 1/2 teaspoon sage, and 1/2 teaspoon nutmeg.

Pour the milk into a 9-by-13-inch baking dish. Top the milk with one third of the noodles. Then spread one third the pumpkin mixture over the noodles and half the meat. Layer half the Swiss chard over the pumpkin/squash and top with a second layer of noodles. Repeat with another layer of pumpkin/squash, meat, Swiss chard and noodles. Spread the remaining pumpkin mixture. Sprinkle with the remaining 1 cup of Parmesan. Cover with aluminum foil and bake for 20 minutes. Uncover and bake until golden, about 15 minutes more.

We are always thankful for the time we can spend with family and friends whether it is on a holiday or some other day. Our memory banks are always full of good times we can remember whether others are with us or not. Whether it was with loved ones or just memories we hope everyone had a good Thanksgiving.

Friday, November 16, 2007

Custom headboard


Padded headboard front and rear views.

Something we have always wanted but did not have until now was a padded headboard for our bed. We did have a headboard with shelves but it never suited us well. To be comfortable while reading in bed we would stuff it full of pillows.

After looking at purchasing a ready-made padded headboard we determined they were too expensive. So we decided to attempt to make one ourselves. Going through materials we had on hand we decided we needed to purchase a sheet of half-inch plywood and two yards of an imitation suede fabric for the cover.

To determine how big to make the headboard we measured the width of the bed, ours is a California king size. Then for the height we wanted it to be 26 inches above the mattress which was 10 inches high. So we made the total height 36 inches.

We rounded the top corners to make it look better. To attach it to the bed we used four recycled 2x4’s, one on each end and two spaced in between. These attached to the back of the headboard as well as to the pedestal of the bed.

Then deciding some shelf space would be nice for things like a Kleenex box and electric blanket controls we made one long one going all the way across, just below the top and a short one on either side about half way down. The top shelf is below the top just enough to keep the items on it out of view from the front. We cut the shelves from other recycled boards we already had on hand. To keep things from falling off the shelves we added a thin strip of molding to the back edge of each shelf.

To cover the front we first cut a piece of two-inch thick foam the same size as the plywood. Then we went to cover it with fabric and discovered it was shorter than the two yards we had ordered. Looking through our collection of fabric on hand we came up with a contrasting piece to sew a strip down the middle. After cutting the larger piece in half and sewing the strip in we stretched it over the foam and plywood. We secured it to the back of the plywood using a staple gun.

After securing the finished headboard to our bed there was only one thing we wanted different. We wished we had made it over 27 years ago. That way we could have enjoyed it our entire married life.

Pictures can be enlarged for better viewing.

Friday, November 9, 2007

Party pleasers


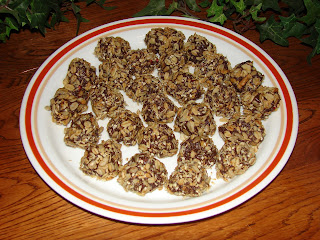
No-bake power balls and peanut butter balls along with walnuts make great party goodies.

Many people are planning to attend parties during the holidays and will be looking for easy-to-make goodies to take with them. The no-bake power balls we recommended in our October 12 column in the Daily News would be great to take to any party, at least if the amount of each ingredient were printed in the article.

It appears that they were eliminated in the editing process after we sent it to the Daily News. This blog site has the proper amounts of ingredients listed, but for those that only read this in the Daily News we will list the recipe again.

The ingredients include:

1/4 cup margarine

1/2 cup honey

1/2 cup carob powder or cocoa powder

1/2 cup chopped walnuts or other nuts

3/4 cup soy milk powder or regular milk powder

1 teaspoon vanilla

1 tablespoon flax seeds or sesame seeds, optional

These ingredients are mixed together in a bowl. Then we form the mix into balls and roll them in unsweetened coconut flakes, granola or more chopped nuts. The recipe we use for granola was in our June 29 blog.

The power balls can be eaten as soon as they are made or stored in the refrigerator for later use.

Another no-bake favorite goodie we like to make is a peanut butter ball.

The ingredients include:

3/4 cup peanut butter

1/2 cup honey

1 teaspoon vanilla

3/4 cup powdered milk

1 cup oatmeal

1/8 cup sesame seeds

1/8 cup flax seeds

2 tablespoons hot water

Mix all ingredients together in a bowl. Form them into balls and roll them in chopped walnuts. We like to use the red walnuts as they add a bit of color.

Store balls in refrigerator until ready to use.

Other goodies we like to take to parties are flavored nuts, both candied and seasoned mixes. Our favorite recipes were posted on Friday, April 20 on this blog.

We welcome our readers to post their favorite party recipes below for others to enjoy.

Friday, November 2, 2007

Children gift ideas


Pictured are items that can be used for a hippopotamus theme story bag.

Walnut harvest is done and we took a much needed day off to do some shopping. What we saw in almost every store was Christmas displays. From the hardware stores to department stores, all are getting a jump on Christmas and it was still October.

Children are making known their wish list. These days top items are electronic, battery operated and lack the need for imagination or a chance to learn. Then throw in the current issue of possible lead paint problems with many toys.

We would like to offer some ideas that are fun, educational and help children be creative. When our children were younger we were introduced to the idea of story bags. This is a cloth bag about the size of a pillowcase filled with items related to a specific theme. One example is things about hippopotamuses.

Items in the bag can include: a stuffed animal, wood puzzle, books with facts about hippos and fiction story books with a hippo as the main character, color books, drawing books, writing paper, pencil, crayons or markers. The items can be age appropriate such as color books for younger children and writing paper for older children to write their own stories.

One idea especially popular with boys is one that includes the book “Backyard Ballistics” by William Gurstelle, accompanied by safety equipment such as ear plugs and goggles to use as they build and experiment with some of the suggested projects. Another book that will intrigue boys is “The Art of the Catapult” by the same author. It gives instructions on how to build seven historic catapults. It will teach them about the physics of levers, force, torsion, tension and traction.

Other story bag themes can be about science topics such as weather which can include a thermometer, barometer, wind gage, rain gage, books about weather and a note book and pen to keep records. Other science topics could be about the solar system, water, geology or animals.

Ideas for other themes could be specific crafts such as origami which could include instruction books and paper to make the different designs. Other crafts ideas could be rubber stamping, paper making, wood crafts or plastic modeling. Included in the bag would be instruction books and items to make the crafts.

Bags could be made for learning to cook, sew, knit, crochet or weave. The ideas are endless. Whether it is for Christmas, a birthday or other special occasion a story bag full of items can spark imagination and learning that can last for years.

Friday, October 26, 2007

Pomegranates & Squash


Butternut squash and pomegranates ready to be processed.

Our pomegranates and Butternut squash needed to be picked and processed during walnut harvest this year. The cool, wet weather was making them split and if not processed immediately would be lost. So several of the days it was too wet to be in the orchard harvesting walnuts we were processing the pomegranates and squash.

We make juice out of the pomegranates. First all the seeds have to be separated from the skin and membranes. Then the seeds are steamed in our juicing kettle. The juice is then poured into canning jars and sealed.

Pomegranates that were not splitting open could be saved a few weeks until harvest was complete. We had over 100 pomegranates on our tree this year! In the grocery store we seen they were selling for $1.99 each. That is too much too let go to waste.

The winter squash that have developed splits we bake and then freeze for later use. Squash that is not damaged can be stored through the winter if keep in a cool, dry place.

A fruit cellar or basement is ideal for long-term storage of canned goods, fruit and vegetables. We have neither. The shelves in our kitchen are shallow and do not hold much so what does not fit there we store on shelves in the hallway and other rooms of the house. The squash and other produce that we keep until they are used goes on the floor along the walls as the lowest part of the room is the coolest.

Winter squash is one of our favorite things to grow as there are many ways of using it in cooking. Squash can be used in any recipe that calls for pumpkin from bread, pies, cakes and cookies to just eating it plain after it is baked.

Our favorite pie recipe uses honey instead of sugar. It has a smoother texture than when made with sugar.

Also we usually skip making the crust and make only the pudding. It cuts down on the calories and the pudding is the best part anyway.

Below is our recipe for squash/pumpkin pudding:

2 cups cooked winter squash or pumpkin

3 eggs

1/2 cup powdered milk

1 cup water

1/2 teaspoon salt

1/2 teaspoon ginger

1 teaspoon cinnamon

1/2 teaspoon nutmeg

1/2 teaspoon cloves

1/4 cup honey

1 tablespoon molasses

1 teaspoon vanilla

Blend all ingredients together. We use a blender but a mixer will also work. Pour into 2-quart casserole dish and bake at 450 for 10 minutes. Then lower the temperature to 350 for 40 more minutes or until a knife poked in the center comes out clean.

To make into a pie pour pudding mixture into a 9-inch pie deep dish pie shell and bake the same as above.

One more reason we like to bake is it helps warm up the house on the cold fall and winter days. The bonus is it also makes the house smell good.

Friday, October 19, 2007

Walnut varieties


Walnut varieties pictured beginning at top left is Livermore, Chandler; center is Franquette; bottom is Vina and Hartley.

A question we get asked a lot is do we grow Black walnuts or English walnuts. The answer is English walnuts, but there are many varieties of English walnuts. Walnut crops grown commercially in California are all English walnuts. Virtually all English walnuts grown in the United States are grown in Central and Northern California.

The main variety grown for sale in-shell has been Hartley, but a newer variety that is gaining in popularity is Howard. The Hartleys have a hard shell. They are about 40 percent nut meat to 60 percent shell. The Howards are a newer variety with a thinner shell and a bigger percentage of nut meat than Hartleys.

The most desirable variety for shelling is Chandler. They are a bigger thin shelled nut with a light colored meat. They crack out at about 50 percent nut meat to 50 percent shell. They are used a lot in candy making. Other varieties are also cracked out when they do not meet the standards for in-shell nuts.

Franquettes, technically known as Scharsch-Franquette, are used as pollinators for many varieties. They are also used as an in-shell nut like the Hartleys but tend to be a little smaller in size.

All nuts are graded by size and color. They are graded down for any shell defects, mold or bug damage.

Our orchard was planted about 50 years ago when the owner at that time choose the Hartley variety. Around 1980 rows of Vinas were planted in between the Hartley rows. At the time Vinas were thought to be better because they could be harvested earlier. Some problems showed up with that variety and now they are out of favor in this area. They originally were used as an in shell nut but now mostly go to be cracked out.

In the late 1980s the ranch was sold to a new owner. Sometime after that most of the Vinas were cut down, but the stumps were left. Then it was realized that production was also down. The Vina stumps were then grafted to Chandler as they were then becoming a popular variety. In 1993 we purchased the orchard.

Most commercial orchards are pulled out and replanted after 30 to 40 years. We have not been able to do that as it takes almost as much money to redo an orchard as it is to buy it. Our plan was to replace trees as they died out but there has not been the funds to do much of that either.

Just for fun we grafted several trees to a newer variety called Livermore. In that variety the nut meats all have red skins. So far it is not grown commercially because the red nut meats are darker and not desired. We like to use them at holidays on top of cakes, cookies and in salads.

To update those who want to know how harvest is going this year. It has turned out to be a rather trying year. We tried to hire help as our daughter was told she had to do jury duty. The help fizzled. Getting temporary farm help is next to impossible. The weather has also been too rainy to work in at times making things go even slower. To top things off this year’s crop going to be one of our smallest yet. It takes just as much work to harvest a large crop as a small crop.

The de-sticking machine has been a big help but it has taken time to learn how to use it. We talked about our de-sticking machine in our September 28 blog.

Now most can guess why they do not see or hear from us much at this time of year. Once harvest starts we go till it is done. Bad weather and equipment breakdowns are the only things we stop for.

Friday, October 12, 2007

No-bake power balls


Pictured is a plate of no-bake power balls.

Energy is something we always wish we had more of. Healthy eating can help and preparing foods that taste good make it easier to do.

We like to pass on fun, easy recipes that are also healthy choices. We have come up with what we call no-bake power balls. They are sweet, crunchy and taste like fudge.

This recipe makes up fast and is easy for children to make as well. Having children help with food preparation can teach them good nutrition but they also use their math skills when measuring out the ingredients.

The cooking and baking at our house is done by both of us. Our children both learned to cook and were given responsibilities for making meals for the family when growing up. One summer we had a Japanese student live with us and she was impressed with the fact that our son knew how to cook. She said the girl he married would be very lucky. According to her, Japanese men had nothing to do with food preparation.

Several of the ingredients in this recipe can be changed depending on personal preference.

The ingredients include:

¼ cup margarine

½ cup honey

½ cup carob powder or cocoa powder

½ cup chopped walnuts or other nuts

¾ cup soy milk powder or regular milk powder

1 teaspoon vanilla

1 tablespoon flax seeds or sesame seeds, optional

These ingredients are mixed together in a bowl. Then we form the mix into balls and roll them in unsweetened coconut flakes, granola or more chopped nuts. The recipe we use for granola is in our June 29 blog.

The power balls can be eaten as soon as they are made or stored in the refrigerator for later use.

Soy products is something we are trying to use more of in our diet. The nutritional benefits are many. The soybean is the best source for protein from the vegetable kingdom.

Minerals found in they soybean include calcium, phosphorus and iron. Vitamins contained in the dried soybeans include A and B. The oil has vitamins A, D, E, F and K. Another virtue of the soybean is that is contains lecithin, a fat-soluble substance containing phosphorus and choline, both necessary for normal body functions.

Soy milk is used by those that are allergic to cow’s milk and has been suggested for those who have suffered or are at high risk for degenerative heart disease. It is used by some who are seeking an unsaturated fat alternative for dairy milk.

Again our goal is to have our nutrition come from a variety of foods. We want the benefit of as many vitamins, minerals and other things that can help us maintain good health for our bodies.

Friday, October 5, 2007

Nutrition in nuts


Pictured are walnuts sitting in their split husks ready to be harvested.

All nuts are a gold mine of essential and beneficial nutrients. They have good fats, protein, dietary fiber, vitamins and minerals. The plant-based fat found in nuts helps lower blood cholesterol and prevent heart disease. Most nuts also are rich in the protein arginine which helps relax blood vessels in the body and lower blood pressure.

Each type of nut has its own chemical profile. Therefore eating variety of nuts is best to get the widest nutritional benefits. For example, walnuts are high in omega-3 fatty acid. This is good for heart health.

The vitamins found in nuts include the antioxidants selenium and vitamin E as well as B vitamins. The antioxidants help battle cell destruction and help protect the body from developing cancer. The B vitamins help maintain healthy skin and hair as well as help with muscle tone.

Minerals the body needs are also plentiful in nuts, such as potassium, calcium, magnesium and more. These help regulate water levels and the metabolism of food in the body; therefore, they help prevent muscle cramping. Furthermore, the minerals found in nuts help maintain strong bones, teeth, red blood cells, hair, skin and nails.

Locally we have a good variety of nuts grown and available for sale. Many roadside fruit stands carry them. A lot of times they are also for sale at local craft sales and harvest festivals. The most available are walnuts, almonds, pecans and pistachios. Getting nuts at harvest time helps insure they are fresh. The best way to keep them longer is to freeze them. Then they are good frozen for up to 18 months.

Adding chemical flavorings, sugar coatings and added salt can greatly take away from the health benefits so the less processed the better. Heat is another thing that takes away from their benefits. Also too much of any one nut is not good either. It is the same as with any other type of food. Variety and balance are key things to remember.

Americans say they want to be healthy but their eating habits as well as other habits are proving otherwise. Also the number of trips they make to see doctors and the number of prescription pills consumed are at an all time high. We hear many complain of the costs these involve and about the side effects pills cause, but not many take steps to avoid them.

Good health does not just happen. It takes eating a balanced diet from a variety of foods, exercise, the right amount of sleep and staying away from unhealthy habits. We don’t have to list those as we are all aware of what they are.

Looking for a quick, easy snack? Reach for a handful of nuts.

Friday, September 28, 2007

Walnut Harvest


Pictured is a de-sticking machine that removes sticks from the rows of nuts. It replaces laborers who would use the rakes standing in front of it.

Walnut harvest has come early this year. With our son and daughter not able to help with harvest this year and not much success in hiring reliable workers this past summer we looked into buying another piece of equipment to get rid of the need for so much handwork.

We are now the owners of a de-sticking machine. For about the price of a new car we can now remove the sticks out of the rows of walnuts by machine instead of using labors with rakes.

The harvest process starts by shaking the nuts out of the trees with a machine that grabs onto the limbs and shakes the nuts loose. Nuts then fall to the ground with sticks, limbs and sometimes small branches, especially from the older trees. Next someone comes along the rows with a sweeper. It has a large head with a rotating drum fitted with fingers to scoot the nuts into rows. It usually takes three or four passes per row to end up with a row of nuts narrow enough to be picked up.

The next thing to do would usually be workers with rakes coming along and removing all the sticks and putting them into piles between the trees to be picked up later. But now, our new machine is next to go down the rows pulled by a tractor. It straddles the nut rows as the de-sticker picks the sticks out and dumps them into the bin at the back. When the bin is full it is taken to the burn pile where it dumps out like a regular dump truck would. This also saves from going back and picking up the piles of sticks later.

After the sticks are removed from the rows the pickup machine goes down each row picking up the nuts and dumping them into a cart pulled behind it. When the cart is full another worker is waiting to change the cart with an empty one and takes the full one to be unloaded onto an elevator that dumps them into a large truck.

When the truck is full it is taken to a huller to have any hulls still on the nuts removed and then they also dry the nuts. We do not have a huller or dryer so we have them done for us. From there they are trucked to our packer who sizes and grades the nuts, then sells them for us. Most of our nuts are sold in-shell to the overseas market. Those that do not make the grade go to a shelling plant to be shelled, packed and shipped to buyers.

That may be the end of harvest but the work for the walnut farmer is never done. Winter time is for pruning the trees and repairing equipment. Springtime brings the need for fertilizer and spraying for blight. Summertime we watch for and spray bugs, irrigate and mow weeds. Before we know it harvest time comes again. No time to be lazy here!

Friday, September 21, 2007

Lace vests


Pictured are two vests showing a front and back view, each made from an old lace antimacassar set.

Crocheted lace was a popular way to decorate 50 plus years ago. Doilies, table clothes and runners were used to protect tables and other furniture as well as to be decorative. They were also used as antimacassar sets, arm and headrest covers, on couches and chairs. Most were made with cotton crochet thread. White and ecru were the most popular colors used.

Lace was also crocheted onto bed linins and towels. Embroidery was also added to these items as well.

A lot of time was spent on making them as well as on the up keep of them. They had to be washed and ironed on a regular basis. Those that were well used also needed worn spots repaired.

As the pace of living life moved into the fast lane there was neither time to make them or keep them in nice condition. Today they may be seen mostly in museums or tucked away in boxes at the back of a closet or attic. Some lace items such as tablecloths are used on special occasions today but even that is a rare event.

We came across some well used ones recently. They had old stains so we tried several whitening agents but none were successful at removing all the stains. There were several sets of arm and headrest covers. After thinking about what we could use them for today the idea to make them into vests came up.

First we decided to dye them a dark green to hide the stains. We just followed the directions in the package for the dying process. After they had been dyed it became obvious that several had been repaired in the past with polyester thread that did not take up the dye. We removed all the old repairs and redid them with thread that matched the new color.

It takes one set of arm covers and one headrest to make a vest. The headrest becomes the vest back and the arm covers are the two front sides. The front sides are attached to the back at the shoulders and under the arms. When worn the shoulder seams fall to the back of the shoulder as seen in the picture above.

The front sides overlap the back about one inch starting at the outside shoulder and taper up to just the edges overlapping at the neck. The sides are only sewed together about two inches beginning at the bottom edge. We stitched them together by hand to hide the stitches.

It does not take long to stitch them together. The dying process, though not complicated, is what took most of the time for the two vests we made.

Other ideas to use old doilies include sewing smaller ones to articles of clothing as decoration accents to attaching them to throw pillows or quilts. Some have even framed a single doily behind glass to be displayed on the wall.

We are always looking for new ways to use old things. It is not only challenging but fun. The closet also has a little more room for another item waiting to be rediscovered!

Friday, September 14, 2007

Yo-yo Pumpkins and more


Pictured are pumpkins crafted for fall decorations.

Fall is around the corner. Pumpkins are traditionally used for both baked goods as well as decorations. We have made different crafts featuring pumpkins over the years. This year our new additions are yo-yo pumpkins, a TP pumpkin and a macramé pumpkin.

No specific pattern is needed to make things from yo-yos. We used round plastic lids from the kitchen in graduated sizes as patterns to achieve the pumpkins pictured above. Our largest ones have seven yo-yos down to the smallest having only three. The finished shape does not need to be perfectly round as real pumpkins are not all perfectly rounded. For the stems we used twigs from trees in our yard. The yo-yos and stems are all glued together with hot glue. Craft glue can also be used to put them together.

After cutting circles of fabric a running stitch is sewed around the outer edge and pulled together to gather the fabric in the center. If the fabric tends to fray the edge can be turned under but the end result will be a smaller yo-yo.

We used cotton and cotton/polyester fabrics. Light weight fabric is best. Thicker fabric will leave a larger hole in the center as it cannot be gathered as tightly.

To find the colors we wanted we looked in our collection of fabric and came up with the ones pictured above. Fabric can also be used from clothing no longer being worn. We came up with three different patterned fabrics in shades of orange. Also we made one with white fabric as real pumpkins come in white.

More details on making yo-yos are in our blog on the yo-yo angel craft we made in April. Also posted is a picture of other items we have made from yo-yos.

Making items from yo-yos is a good project that is easy for all ages. They are good for clubs and after-school groups looking for inexpensive craft projects.

Another easy to make pumpkin is the TP pumpkin. It is made from an 18-inch fabric square gathered up around a roll of toilet paper and poked into the center of the roll. A stick is used for the stem and a green floral wire is curled for extra decoration. This is a regular size TP roll. A larger roll will need a larger square of fabric.

The macramé pumpkin is made from a wire clothes hanger bent to make the desired shape with floral wire to make the lines for the inside ribs. The wire frame is not flat so it gives more of a three dimensional look. We then knotted orange macramé cord around the wires of the pumpkin shape and green was woven on the stem. Again we have no pattern as we made it up as we went. Pumpkins come in all shapes and sizes so creating pumpkin decorations can reflect that fact.

Other pumpkins crafts we have made in the past include pumpkin shapes cut from wood. Then they are painted and embellished with wood and silk leaves, wire stems and raffia bows. Also we quilted wall hangings with the precut pumpkin shapes ironed on with fusible web and accented with fabric paint and other embellishments.

When decorating we try to use what we have around us as apposed to buying preassembled decorations. Being creative is fun and is something the whole family can participate in.

Friday, September 7, 2007

Nutrition


Pictured is produce being enjoyed at the Love house this week.

There is a pot of gold at the end of the rainbow. Yes, it is true! A rainbow of vegetables, from white onions, yellow squash, orange pumpkins, red tomatoes, purple eggplant, green beans, blueberries and more. The gold is good health.

Good nutrition is something that is talked about a lot, but from what we see not many take action to achieve it. There are many good books full of facts. Many speakers talk about the do’s and don’ts of healthy eating. But the larger fact is fast food industry; the quick and easy pre-packaged meals and junk food are all doing big business.

Healthy eating is not something that is hard to do but it does take a conscious effort to do it right. No books, charts or graphs are needed to achieve it. A few simple guidelines are all that are needed along with a goal to live a healthy lifestyle.

The ideal way to have the best quality food is to grow or raise it yourself. If that is not possible the next best is the farmers market and local fruit stands, butcher shop and mill. The closer to home the food sources are the fresher it is and it is usually better in quality also.

For those who shop in the supermarket, the easy way to select healthy food is to stick to the outer isles of the grocery section. That primarily includes the fruits and vegetable section, the dairy products and meats. The only other main section to visit is the baking section.

Fruits and vegetables come in all colors. The different colors indicate the vitamins and minerals in them. We don’t need to know the specific vitamins and minerals in each one. The best is to use as many different ones as possible. The more variety eaten the more balanced the diet. Every color group is important.

Herbs and spices are also important for good nutrition. They are used to flavor our food, but they have important nutritional value also. Again we don’t need to know exactly what nutrients are in each, but to use as wide a variety as possible. That way we get the benefit of things good for our health as well as a wide variety of taste choices.

Protein is necessary in a good diet. Most people get it from eating meat. Other good sources come from beans, nuts, eggs and dairy products. Nuts make great snacks and our favorite recipes to season them were posted at this blog site in April.

Fiber is just as important. It is primarily found in whole grains and nuts as well as some fruits and vegetables. We prefer to start most days with pancakes made with ground rice and oatmeal. Our recipe is still available at our blog sight at the address listed below. It was in our first blog in March.

Other choices can be a bowl of oatmeal with cinnamon and raisins or a bowl of rice sweetened with honey or maple syrup in the morning. For lunch or dinner rice can be seasoned with garlic, pepper, ginger or a personal favorite spice.

If good health is the goal, the rules to remember are to obtain fresh and local grown or raised food, making sure to have a wide variety of fruits, vegetables, grains and protein. It is easy to do, but will not happen with out serious intent. Meals do not have to be elaborate or difficult to prepare. Again we made suggestions in our column about quick and easy meals in April. It is also on this blog site.

Tehama County, California is a great area to find a good variety of foods that are not only good for us but taste good. We are very fortunate.

Friday, August 31, 2007

Fruit Rollups


Pictured are two applesauce fruit rollups drying in the sun on top of a tray of almonds also set out to dry.


The canning jars at our house are still being filled with all sorts of summer fruit. Sometimes we also dry small amounts of fruit or make fruit rollups. When making applesauce we sometimes end up with more than we can process in one batch.

If it is only a quart or two over a batch we turn the extra into fruit rollups. We mix in a little honey, lemon juice and cinnamon to spice them up. The amount of sweetener and spices can vary depending on individual preferences. The lemon juice is to keep it from turning dark and discolored. Other spices that can be used are nutmeg, mace, allspice or pumpkin pie spice which is a premixed combination of some of the other spices mentioned.

To dry the fruit rollups we use cookie sheets covered with plastic wrap. Each cookie sheet holds about one pint of applesauce. With the applesauce spread out evenly over the plastic wrap, we set it in the sun to dry. They only take one day to dry. Then we roll them up and store them in the refrigerator or freezer.

Rollups can also be made with other fruit. The fruit can be pureed in a blender. Then the spices, sweetener and lemon juice added as desired and spread on cookie sheets covered with plastic wrap to dry. The rollups are great to take for lunch or just keep around for snacks.

Drying fruit in halves or slices is also a good way to preserve extra fruit. The thicker the slices the longer the drying time will be. Seedless grapes are one thing we dry more of and they are small enough to dry whole. They make great raisins to add to cookies, bread, salads or other recipes. Other dried fruit can also be used in baking but usually needs to be cut into smaller pieces.

There are also different ways of keeping the fruit from turning dark or discolored. The discoloration does not affect the flavor or make it bad to use. It is only a matter of looks. We mostly use lemon juice for the fruit rollups. For the cut fruit, we soak it in a bowl of water with ascorbic acid powder added.

When drying fruit we set it out in the sun to dry. Dehydrators made for fruit drying can also be used. They are sometimes faster than sun drying but use electricity.

To make the fruit last longer we store it in the freezer after it is dried. This is a sure way to keep bugs out of it. Also if any moisture is still in the fruit, it will keep it from growing mold.

We still are busy with other garden produce also. Our tomato production has been down a little this year. We have had plenty to eat fresh, but for canning purposes we have had only enough once for a small batch of tomato juice.

Almonds are plentiful this year. We are busy shelling them so they take up less space in the freezer. It also looks like we will have plenty of concord grapes to make juice from. They are just about ready to pick.

Yes, this is all a lot of work but the payoff is worth it. Fruit and vegetables that are allowed to fully ripen in the garden taste better, even after canning or drying than store bought varieties. We also like having control of what additives are or are not included in our food.

Friday, August 24, 2007

Dog bed


Pictured is Shadow on her bed made from recycled materials.


Our dog is spoiled. For one, she likes soft things to lie on. Wanting to have a comfortable place for our dog to sleep we set out to shop for a dog bed. Pet accessories are big business, we discovered. There are stores that specialize in nothing but pet supplies. They carry everything from pet food to toys, food dishes, leashes, cages, beds and more.

We found that dog beds are a little pricey. After giving the matter some thought we decided on a customized bed made by recycling items we already had on hand. A king size egg-crate mattress pad that we no longer were using became the filler. We cut three 30 by 40-inch pieces from the pad. Then stacking them one on top of the other it made a nice inner-cushion.

Next we decided it needed a durable cover so we got out a box of jeans that were beyond repair. We saved them to someday make quilt squares out of the parts that were still good. It seemed like this would be a good time to put some of those quilt squares to use for the dog bed cover.

We used a 7-inch cardboard square for our pattern. After cutting a big stack of them we sewed them in strips long enough to go around the bed. Then we sewed the strips together until we achieved the proper width for the cover. We made half-inch seams, making the finished squares to be 6-inches each.

Coming across a large bag of socks that had lost their mate over the years, we decided to make a blanket for the dog bed. We cut the tops off of each sock and after sorting them by color, sewed them end to end. Next we sewed the rows together making the sock blanket big enough to cover the top of the dog bed. To sew the sock pieces and rows together we set the sewing machine on the largest zigzag stitch possible and butted the ends and sides of the socks together as we sewed them. Since the socks were all colors we choose red for the thread color adding an extra design element to the blanket.

Due to our recycling efforts the cost of the dog bed only amounted to the time and effort it took to make it. And since it was a fun activity the cost seemed negligible and the landfill was deprived of things most people probably throw out. Anytime we can recycle and reuse items, giving them new life, we feel an extra sense of accomplishment.

The dog has approved of the bed and uses it regularly. We all are very happy with the final outcome.

Saturday, August 18, 2007

Thai Party


Craig Love is making Pad see ew, Suzanne Love the ginger and chicken stir fry. Pictured at bottom right is the beef and bamboo curry being made by Charlene Love.


We were in the mood for Thai food, but didn’t want to go out to a restaurant this time. We decided, along with our daughter, to have a Thai party at our house! So we invited friends and family over for an evening of fun and trying out new Thai dishes. We began by looking on the internet for some good recipes. There were quite a few on several different sites but the ones that appealed to us the most were at ThaiTable.com. We chose to make three main dishes: pork and garlic stir fry, chicken and ginger stir fry, and beef and bamboo shoot curry served over rice. Also from that site we choose recipes for two appetizers and desert. For the appetizers we made were marinated grilled pork on skewers with peanut sauce and cucumbers salad and for desert we made pumpkin in coconut milk.

We tried out all the recipes a couple of times before the party, just to make sure we didn’t have a complete flop when our guests were here. Our daughter likes to experiment with new cooking methods, so during the process of selecting dishes to serve, she learned how to make rice noodles. They turned out better than ones from the store.

The recipe for making rice noodles that we used is at asiarecipe.com/ricenoodles.html. We thought it was not too difficult to make but it takes a little time. It is necessary to make them up ahead.

Some ingredients that were called for are not ones we use on a regular basis. Most of the local supermarkets have things like kale, coconut milk and bamboo shoots. Some of the recipes that called for vegetables like Chinese broccoli gave suggestions for substitutes like bok choy that were also available locally. Thai food can be very spicy. But when you make it yourself, it can be anything you want. Most of the recipes we used said that the dishes were usually seasoned at the table to taste.

The cucumber and shallot salad was prepared ahead of time. The vegetables and meat were also cut up beforehand. Desert was another thing that we were able to prepare ahead of time. The pumpkin desert is really made with winter squash, not pumpkin as we know it.

When all our guests had arrived we put the pork skewers in the broiler. As soon as they were done we served them and the salad as appetizers and immediately started the three main dishes. With three of us cooking at once, one using an electric skillet and two at the stove, we made all these dishes simultaneously, which was a lot of fun.

One of the main dishes we made is called Pad see ew. It is a type of stir fry combining pork, garlic, rice noodles and Chinese broccoli. The dish is easy and only takes a few minutes to make. Another dish was ginger and chicken stir fry. It features mushrooms, garlic, ginger, and chicken stir fried with some sugar and fish sauce. For stir frying, we usually use a frying pan but a wok would probably work better. Some of the dishes can get voluminous when adding noodles or greens. The other main dish we made was beef and bamboo shoot curry. It uses curry paste, fish sauce, bamboo shoots, coconut milk and beef, then is served over rice.

After dinner we played an enjoyable round of Balderdash. Many laughs were had by all present.

Friday, August 10, 2007

Information Sources


Information sources shown are Betty Crocker’s Cookbook, Better Homes and Garden Cookbook, The Rodale Cookbook, The Encyclopedia of Country Living, Countryside magazines and the More-with-Less Cookbook.


Sources of information are greater now than ever before for growing, cooking and preserving food. In the past we relied only on books, magazines and talking to others who had knowledge in the areas we were interested in. Now we also can do searches on the internet for information.

Recently someone asked us if we knew how to pickle walnuts. We said no, but while talking to them we sat down at the computer and typed “pickled walnuts” into a Google search and sure enough there was information on how to pickle walnuts! It doesn’t look like something we would ever try, but the information is available for those who do.

The book we have found most useful for the things we do is “The Encyclopedia of Country Living” by Carla Emery. She has gathered practical advice and information by talking to folks and farmers from all over the country. In about 1969 she began the process of gathering information, mainly for her own personal use. Then in 1974 she mimeographed the first edition.

Other editions quickly followed as she gathered information. The latest is the updated ninth edition with more than 1,500 mail-order sources, checked and updated and the addition of websites and e-mail addresses. At the back of the book there is an explanation of the chronology of the different editions printed.

Information given in the book includes old-fashioned methods as well as updated methods for raising farm animals, making a chicken coop, catching a pig, growing plants, to cooking and preserving food. Other information tells how to cook on a wood stove, churn butter, grow herbs, make sausage and more.

We first came across the ninth edition in 1994, but used it so much it was falling apart and had pages missing. Our current copy is the updated ninth edition printed in 2003. It has so much information it is the first place we look when we have questions about how to do something.

Cookbooks that are useful are “The Rodale Cookbook” by Nancy Albright and the “More-with-Less Cookbook” by Doris Janzen Longacre. The first is good because they avoid sugar and use many kinds of flour instead of just wheat. They stay away from using white flour. The second uses basic ingredients focusing on recipes that are economic as well as nutritious and good tasting.

Two basic cookbooks that get used at our house are “Betty Crocker’s Cookbook” and “Better Homes and Garden Cookbook” for general information. Usually older cookbooks are more useful to us as newer cookbooks list ingredients such as a can of this and a bag or box of that. Older cookbooks don’t use as many processed foods in their ingredient lists.

The “Countryside and Small Stock Journal” magazine has also been useful for information in many areas. Many people write in about their experiences with raising animals, growing gardens, using alternative power sources, food preparation and even building houses. Hearing information first hand from someone with experience is always most desirable but not always possible. Being able to read about the experiences of others is the next best thing.

Nowadays the internet is becoming a better source to find information even faster. Search engines such as Google can quickly locate a vast variety of information for every topic imaginable. The more places one can find information the better. Gathering differing methods and preferences from others helps us make more informed choices.